Repair when Not in Use
How to identify and fix toilet flapper leaks
This article will help you repair and find a leak in your tank.
Read below if you:
3. Need tips on inspecting your flapper
4. Need instructions on finding a slow leak
5. Need a diagram of leak points within a toilet tank
6. Need to know what “Ghost Flushing” is
7. Need to know what “Siphoning” is
- Check the flush valve seat for corrosion or unevenness. Move your finger around the seat rim to check for irregularities or nicks. If there are any irregularities on the flush valve seat, then you will need to replace the flush valve.
- If your brass overflow pipe requires a flapper adapter ring to connect your flapper to the overflow pipe make sure the pipe adapter is square to the drain.
- If you are using a flapper pipe adaptor to hold your flapper to the flush valve turn the pipe adapter to the left or right to center the flapper over the drain hole. If the back half of the flapper has a gap between the rubber and the seat Fluidmaster recommends exchanging the flapper with our Flexible Frame Flapper models (503, 504 or 5051).
- Some brass overflow pipes are threaded at the bottom. This is a potential leak location that can be tightened by turning it. If the pipe has pin holes or corrosion in this area, replace the brass overflow pipe.
- Some flush valves that have oval overflow pipes or have an angled seat may not accommodate rigid frame flappers. In this case, use an Flexible Frame models 503*, 504* and 5051*.
*Note: The Fluidmaster flappers # 503* and # 504* are for toilets manufactured before 1994.
*Note: The 5051 flapper is for a toilet manufactured after 1994.
- Check the flush valve seat for corrosion or unevenness. Move your finger around the seat rim to check for irregularities or nicks. If there are any irregularities on the flush valve seat, you will need to replace or repair the flush valve.
- If you are using a flapper pipe adaptor to hold your flapper to the flush valve turn the pipe adapter to the left or right to center the flapper over the drain hole. If the back half of the flapper has a gap between the rubber and the seat Fluidmaster recommends exchanging the flapper with our Flexible Frame Flapper models 503*, 504* or 5051*.
- Some flush valves that have oval overflow pipes or have an angled seat may not accommodate rigid frame flappers. In this case, use an Flexible Frame models 503*, 504* and 5051*.
*Note: The Fluidmaster flappers # 503 and # 504 are for toilets manufactured before 1994. The 5051 flapper is for a toilet manufactured after 1994.
- If the flapper is more than 5 years old, simply change it. The time saved will outweigh the cost of fussing with an aged flapper.
- If the flapper is less than 5 years old, check the rubber surface for debris. Wipe slime and/or debris from the underside and flush valve seat with a clean cloth.
- Cut excess chain if it is interfering with the seating of the flapper. Makes sure the chain is not too straight. It may lift the flapper from the seat. Have 1/4″to 1/2″ slack in chain.
- If the flat rubber piece is warped then replace it. If you use chlorine tablets in the tank this would be the cause of the warping.
- Remove the tablet (it damages parts in the tank) and replace with 8300 Flush ‘n Sparkle Bleach Kit.
Please refer to Fluidmaster warning: DO NOT USE IN-TANK DROP-IN TOILET BOWL CLEANERS CONTAINING BLEACH OR CHLORINE.
Use of such products will: (1) RESULT IN DAMAGE to tank components and MAY CAUSE FLOODING and PROPERTY DAMAGE and (2) VOID FLUIDMASTER WARRANTY.
Fluidmaster Flush ‘n Sparkle Toilet Bowl Cleaning System is recommended for those choosing to use in-tank bowl cleaners and WILL NOT VOID the FLUIDMASTER WARRANTY because it will not damage the components.
4. Finding a slow leak (Instructions)
Die tablets or food coloring can be used in a tank to confirm they have a leak. This is great for verifying a faster leak but it does not always verify a slow leak and does not confirm where the leak is occurring. The best troubleshooting procedure for determining the leak point is as follows:
- With a full tank, turn the water off at the shut of valve. DO NOT flush the toilet.
- Make a pencil mark in the tank at the current water level.
- Wait 15 minutes. If the water level has dropped, make a new pencil mark. If it hasn’t changed significantly wait a little longer.
- Repeat step C until the water level no longer changes.
- Inspect the flush valve for a leak point just above the surface of the water.
Results:
- The water level will drop down to the level of the leak and stop.
- If the flapper is worn or the seat that the flapper rests on is damaged, the water level will stop just below the flapper.
- If the gasket that seals the flush valve into the tank is deteriorated and leaking, the water would most likely drain completely out of the tank.
- If a leak occurs at a flush valve gasket in new installations, the lock nut may need to be tightened further. The flush valve lock nut should be tightened no more than 1/2 turn beyond hand tight.
5. Diagram of leak points within a toilet tank
Take a look at the diagram below, to get the info on the corresponding numbered part.
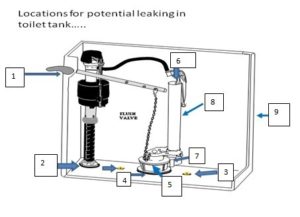
- Tank Lever: Leaking out the handle hole should never happen as long as your overflow pipe (8) is cut or adjusted to the correct height. Fluidmaster recommends 1 inch (or more) below the Tank Lever.
- Shank Washer: If you see water leaking from the area of the fill valves shank; shut the water off at the wall. If the leak stops, then replace the supply line. If the leak continues, try tightening the fill valve’s lock nut by hand only. If the leak continues, remove the fill valve and replace the shank washer.
- Bolts: Leaks at the bolts are sometimes hard to identify, but most leaks that occur between the tank and bowl are caused by deteriorating bolt gaskets or loose nuts. First, make sure the tank is securely tightened to the bowl so that it does not rock. If there is any movement in the tank, tighten each tank bolts a little at a time until the tank is sturdy and does not rock. Second replace using only Brass Bolts and new bolt washers.
- Flush Valve Gasket: Leaks at the flush valve gasket are usually not visible and almost always leaks into the bowl. Although, if both the flush valve gasket and tank to bowl gasket are failing to create a tight seal then it is possible you would see it leak out onto the floor. Replacing the flush valve and gaskets are recommended.
- Flapper or Flush Valve Seal: Flapper leaks are the most common leak point and always leaks directly into the bowl. Tower or canister style flush valves will have a flat seal in place of a traditional flapper.
- Refill Tube: Water dripping from the refill tube into the overflow pipe could be caused by siphoning. Siphoning occurs when the refill tube is pushed too far into the flush valves overflow pipe.
- Flush Valve Joints: Leaks can also occur at the joints (plastic flush valves) or threaded joints (brass flush valves).
- Overflow Pipe: Cracks in the plastic overflow pipes are not uncommon as after time the plastic can become brittle.
- Tank: Cracks or chips in the tank are another cause of leaks.
Ghost Flushing is merely a fill valve’s way of letting you know you have water leaking out of your tank. The time interval between ghost flushes will vary as the leak rate increases or decreases.
For example, the most common leak is a flapper leak. The time duration between refills could be seconds apart or minutes apart depending on the severity of the leak.
On the other hand, a flush valve gasket leak is much slower and the ghost flushing can occur hours apart or even days apart.
Siphoning occurs when the refill tube is pushed too far into the flush valves overflow pipe.
If the end of the tube is inserted into the overflow pipe and the end of the tube is lower than the water level inside the tank, water will siphon out of the tank and into the bowl.
This will cause the water level in the tank to drop and a Ghost Flush will occur.
Make sure the refill tube is connected to the top of the flush valves overflow pipe so that it is above the water line at all times.
To download our free guide to fix common toilet problems please click here: Fluidmaster Toilet Repair Guide