Repair when Flushing
Solutions for common Dual Flush toilet Problems
This article will cover the most common issues and questions concerning the Duo Flush Converter and its installation.
You can also watch this video:
Read any of the following below if:
3. Your fill valve turns on and off periodically (ghost flushing).
4. You want to remove the Duo Flush valve from the seat.
Or Watch the instructional video for the Duo Flush System Toilet Converter
1. The Full and / or Half flush closes immediately after tank lever is released.
-
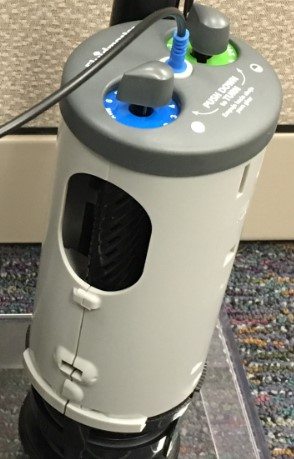
- Set water level higher: Water level should be half way to all the way over the oval windows of the Duo Flush valve (See picture below). If your water level cannot be increased, the Duo Flush system should not be used.
- Once water level has been set, set both adjustment dials to maximum setting.
- Place 3 pieces of toilet paper in the bowl and flush, if the bowl evacuates the toilet paper, lower the green dial setting by one number and repeat flush.
- Continue this process until toilet does not evacuate the paper and adjust dial up 1 setting. This is the lowest possible setting while maintaining a good half flush.
- Set the BLUE dial one to two settings higher than that of the GREEN dial.
2. Water level is half way or completely over the oval opening and the full and half flush are working but the bowl is not clearing out.
- Make sure the water level in the toilet bowl is up to its highest capacity.
- Make sure the refill tube (rubber hose) is supplying water down the overflow pipe and not into the tank.
- Adjust the roller clamp on the refill tube so that it is allowing full flow. The “Rolling Pin” should be set to “8” which is full flow.
- Using the GREEN dial, adjust the half flush setting one setting higher.
- Repeat this process until the proper water level is reached.
- If you are not using Fluidmaster’s PerforMAX fill valve, your fill valve may not have enough output to refill the bowl. Fluidmaster recommends using the 400AH PerforMAX Fill Valve.
3. Fill valve turns on and off periodically (ghost flushing).
Water is leaking from the tank into the bowl at one or more leak points. Follow the steps below:
- Remove the Duo Flush valve from the valve seat and clean both the Duo Flush seal and the plastic seat the seal sits upon.
- Pull angled seat adapter straight up until it pulls free from flush valve seat. Turn adapter upside down and reshape putty ring, spread putty evenly around entire base of adaptor.
- Check the black seal at the base of your original flush valve/ overflow pipe unit. If you get black residue on your fingers when you touch the seal, replace the flush valve. If seal is good reseat angled seat adaptor.
- Inspect the overflow pipe for obvious cracks.
- Make sure the refill tube (rubber hose) is clipped to the side of the overflow pipe and not directly shoved into the overflow pipe.
- Replace Duo Flush onto valve seat and turn on water, check for leaks.
4. Removing the Duo Flush valve from the seat
- Gently rock the Duo Flush canister away from the overflow pipe and pull up.
5. Removing the activation box (both newer and older versions of the converter) once it has been snapped onto to the tank lever.
- On older versions of Duo Flush, grab hold of the activation box in the tank and pull it toward the back of the tank. You may need to give it a strong jerk to unsnap it.
- On newer versions on the Duo Flush, there is a push button on top of the activation box. Simply push in the button and pull away from the tank lever.
6. The tank lever sticks in the up or down position, it does not return to a horizontal position after you flush.
Remove the toilet lever from the tank and remove the black spacer from the tank lever spacing nut, follow these steps:
- Push the button on the top of the actuator handle box and release the box and cable from the tank lever thread.
- Remove the lock nut from toilet handle thread; this is a reverse threaded nut, turn nut counterclockwise to release the nut.
- Remove the toilet handle from the front of the tank.
- Remove the black rubber (square shaped) spacer from tank lever’s spacing nut.
Replacing tank lever:
- Replace tank lever back into the tank’s lever mounting hole. Make sure to push the lever all the way in ensuring the tank lever is flush with the face of the tank.
- Tighten lock nut onto the tank lever thread; this is a reverse threaded nut, turn nut clock wise to tighten nut.
- Snap actuator box onto tank lever thread.
- Replace the tank lever without the spacer and retry the flush.
Or Download the Duo Flush System Toilet Converter installation instructions
To download our free guide to fix common toilet problems please click here: Fluidmaster Toilet Repair Guide