Repair when Flushing
How to fix a weak or incomplete toilet flush
Toilets that have been in use for some time can develop a lazy or weak toilet flush or just does not flush properly. It is quite common for minerals such as calcium and lime, along with debris particles such as rust to build up in the rim feed and jet holes of the toilet bowl. Over time, these deposits restrict and block water from flowing into the toilet bowl which will cause a weak or incomplete flush.
Read below for more information on:
1. How to clean the rim feed holes and clear the jet.
2. Other causes for an incomplete or weak flush
1. Cleaning the rim (feed holes) and jet holes of your toilet
-
- Turn the water supply valve off.
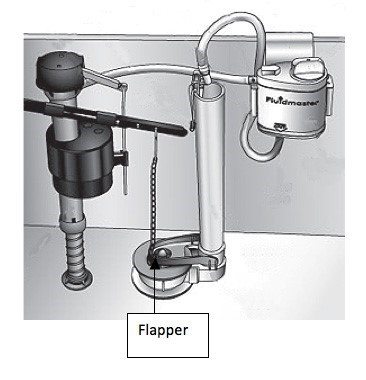
- Holding the flapper open (see Picture below), let the majority of the water fall out of the tank.

-
- Using a toilet bowl cleaner, for example Lime-A-Way® or Clorox®, hold the flapper open and pour 1–2 cups of cleaning solution down the flush valve opening. Be careful to not let any cleaner spill over into the tank. If it does, wipe it up immediately. Let the toilet sit unused for several hours or overnight. The cleaning solution will work its way into the flow channels and help to dissolve any mineral build up.
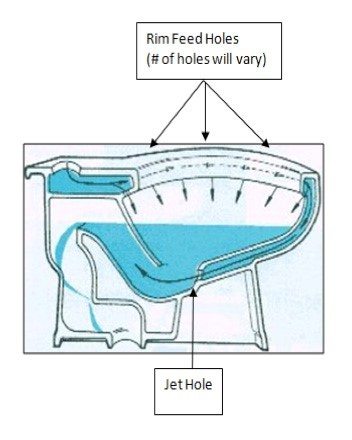
- Using a wire hanger, feed the hanger into the rim feed holes located under the lip of the toilet (see Picture below). Work the hanger in and out of the holes several times to scrape away and break free any hard build up.

- Turn the water supply back on and let the tank refill. Flush the toilet several times to flush out any leftover cleaning solution or deposits.
- To clear the jet, using the wire hanger, make a small hook at the end of the hanger. Push the hanger up into the jet hole and fish out any paper or waste that may be trapped in the jet passage way. (See picture above.)
2. Other Causes for an Incomplete or Weak Flush
- Check the Water Level in the tank. If your water level is more than 1 inch below the top of the overflow pipe, it may be that the low water level is not enough for a good flush. Raise the water level to within 1 inch of the top of the overflow pipe using the water level adjustment screw on the fill valve or by adjusting the height of the fill valve.
- Flapper closes too soon (and water level is at the appropriate height). If the flapper closes too quickly during the flush, not enough water is released to complete the flush.
NOTE: Make sure there is minimal slack on the flapper chain. For most toilets, there should only be ½ inch of slack of chain length needed to operate the flapper
If you have a toilet that uses 5.0 gallons per flush (gpf) or more, make sure that you are using a non-adjustable flapper.
If you have a toilet that uses 3.5 gpf, 1.6 gpf or less, check the flapper for adjustable settings.
3. New Fluidmaster Kit or New 502 Flapper
Watch video on adjusting the 502 High Performance flapper (model) 502
- If you have installed a new Complete Kit or one of our adjustable flappers, make sure that the flapper adjustable setting is set properly.
- Look on the top of the rubber part of the 502 flapper. You will notice numbers 1–9 (Min–Max). The number that is located directly in front of the chain is what the flapper is set on. The lower the number it is set to, the quicker the flapper will close, allowing less water to flush out of the tank. The higher the number it is set to, the longer the flapper will stay open, allowing more water to flush out of the tank.
- Trial and error will determine the proper setting for your toilet. Drop 2–3 pieces of toilet paper in the bowl and flush your toilet. If the bowl clears, lower the setting on the flapper by one and flush again. Repeat these steps until the bowl does not clear, then set the flapper one setting higher from your unsuccessful flush. This will give you the most efficient (water savings) toilet flush.
If you need to replace any of the toilet parts, why not get Fluidmaster’s Everything Kit includes everything you need to fix your toilet in one purchase?
If you are in the U.S. and have a 2″ flush valve toilet, we recommend the 2″ Everything Kit
If you are in the U.S. and have a 3″ flush valve toilet, we recommend the 3″ Everything Kit
If you are in Canada and have a 2″ flush valve toilet, we recommend the 2″ Everything Kit
If you are in Canada and have a 3″ flush valve toilet, we recommend both the 540AKR Flush Valve and the 400H Fill Valve
To download our free guide to fix common toilet problems please click here: Fluidmaster Toilet Repair Guide

